For the first week of April my elementary math number line game is free. You can find it here. It's a card game that requires some printing and cutting to make the components. If you have any feedback on the game, please let me know!
I included this information about the value of such games at the end of the rule document:
I knew from teaching math that number lines were important for visualization. I created a number line game years ago, but when I tested it with some first graders, I soon found my initial ideas had some issues. I put the game on the shelf. Then recently I heard Jo Boaler make a statement like this one,
Researchers even found that after four 15-minute sessions of playing a game with a number line, differences in knowledge between students from low-income backgrounds and those from middle-income backgrounds were eliminated (Siegler & Ramani, 2008). (Quoted from here)
I don’t know that Jo Boaler would endorse this game, but after hearing her, I knew I had to return to it! I fixed the gameplay problems and tested it with groups of students from ages 7 to 11. They were immediately hooked! I have been so impressed with how even the youngest students had no problems playing, even when some versions had a number line with negative numbers!
Here are some tips, all of which are just pointing out features of Google Slides that make it useful for layouts in general:
Use Word Art for large letters or numbers, as shown on my example image.
If you use ctrl-c and ctrl-v to copy and paste a card or contents of a card, you can use the arrow keys to move it around. Each tap of an arrow key moves a selected object 1/12". Moving on a grid like that makes it easy to copy, paste and move objects over or down to the next card quickly, still keeping everything lined up.
Use the shapes in Google Slides' shape menu as building blocks for more complex shapes. For quick prototypes, you'll be surprised how easy it is to make some functional images and icons to help with early playtesting.
When you're done laying out the cards, you can just print them and cut them out. If you need to make them available to others, you can download the whole slideshow as a PDF. I've found some fonts will change size slightly and mess up the layout when you convert, so take a look at the file before sending it off to anyone.
Contact me if you have questions about using this template. I'll update this post with more information as I get questions.
I'll be presenting at the annual MACUL conference in a couple weeks. My friend Clark Rodeffer and I will be returning to a topic we presented on in 2017--non-digital game design projects.
We are going to focus on just one game, which I called Diamonds and Stars. It's one of several Game Design Project Packs. They each involve a simple game students can learn and play within one class period. Then resources are provided that allow the students to apply a theme to the game based on what they're studying in class. Through discussing and exploring the content, they delve into the material to form connections that fits the gameplay.
The full Diamond and Stars Project Pack can be found here.
Here's the video that shows how to play:
And here is the Diamonds and Stars Planning Sheet, which requires the students to discuss the lesson content and use it to add a theme to the game.
Our Go Beyond Challenge is wrapping up this week, as I prepare to show everything we've done at the MACUL Conference in Michigan. This post highlights a project I did with Katie Bryant in middle school Science.
Katie wanted to have her class create public service announcements about the declining sturgeon population. This is a project she has done at previous schools, but we tried it in a new way, using a combination of Google Slides and iPads. It's a subject that's important to her and the students. They have a sturgeon in a classroom aquarium, which they will release into the wild later this school year.
Students worked in pairs on this project. Three examples of their videos can be found below. First, here's the process the class went through to create their videos:
Katie gave the class an introduction about the topic and allowed them to research. They started out knowing they'd be making videos that the community would watch.
Using Chromebooks, they wrote scripts in Google Docs, then made a slideshow in Google Slides. We emphasized that they could not just read their slides in this project. Slides should have little or no text.
Students then opened their slideshows on the iPad using the Google Slides app. They took a screenshot of each slide, as a simple way to transfer each one into Photos on the device.
Next, students recorded their scripts using the Voice Record Pro app on an iPad. I've used this app for years for quick, easy audio recording, and it's only improved over time. See below for why we started with this app. These recordings were usually 30 - 60 seconds long.
Using the process explained below, students transferred their audio from Voice Record Pro to iMovie.
They added images from Photos to the audio track in iMovie. It was very intuitive for them to adjust the length of each image to fit their narration.
Videos were exported from iMovie and uploaded to Google Drive using the Google Drive app. From there, students could turn them in on Google Classroom, using their Chromebooks.
If you're familiar with iMovie on the iPad, you might wonder why we bothered with the Voice Record Pro app. Well, I tried recording narration directly into the video using iMovie, but it required the pictures, or at least one picture, to already be in the project. It seemed backwards to add all the images, guess how long they should be, record audio, then adjust the length of each image.
So the video below shows an overview of our process for recording and transferring to iMovie. Students recorded their script from beginning to end using Voice Record Pro. Then we converted it to mp3 (since iMovie wouldn't accept the original file format). We exported that into iMovie.
Most students did not have experience with iMovie prior to this project, but they picked up the video editing process quickly. Unlike other processes I've used, adding the images to their narration and adjusting the timing of the images was probably the fastest part of this project.
Some students did an extra step of adding music. Unfortunately this wasn't as easy as I hoped. When we first tried to add music, iMovie replaced the students' narration. So we had to do it in two stages. We exported their video (without music). We then created a new iMovie project consisting of that exported video, plus the audio soundtrack. This is pretty intuitive if you're used to iMovie, but it involved just enough taps that some students got confused. Also, they often had the music louder than the narration, so this was something I eventually encouraged them to skip.
Example Videos
Reflections
With some weather related school closing and other schedule disruptions, this project took a few days longer than we hoped. We also had some snags with the Google Slides app not updating properly on the iPads. Katie was very flexible with all of this, and she's happy to try the project again next year.
She told me the best thing about the project is it's real to the students. The problem is real, with some of the fishing taking place fairly close to our area. Katie has a sturgeon in the classroom that the students see every day. They knew they were creating for a real audience.
The script and slides took a little longer than we expected, but the big surprise for me was how the audio recording posed such a challenge. First, it was a little tricky finding quiet places to record. There's always some unexpected background noise in a school. We got help from teachers on prep, using their classrooms or the library. And a few groups took entirely too long to record. Even though the scripts were short, they'd mess up something and end up doing many, many takes. Some editing of the audio is possible in iMovie, but (using the process I outlined above) it is best if they can get a good recording from start to finish rather than try to edit it afterward.
We asked students what they liked and didn't like about the project. As we could have guessed, writing the script was far from their favorite. Most students prefer to do an outline at best, then "wing it", but that was not an option for them on this project. Many liked researching the topic, making the slides or recording with iMovie best. I took the opportunity to show them how to use Word Art and add drop shadows in Google Slides, since that was new to many of them.
If we do this again, we will:
Not assume the iPads are ready to go.
Be sure partners share the work on the different devices, so everyone gets a chance to experience the tech procedures.
Make a better outline of steps for students, so they can be more self-directed on the tech part.
Coach the students better about volume and pacing as they read the scripts.
I worked with LeeAnn Raible recently as part of our Go Beyond Challenge. She had the idea of letting students make word problems using addition and subtraction, then they'd record their solutions with Seesaw.
I'll embed some of their examples at the end of the poast.
She called the project Number Story Ninjas, and we also connected with another elementary school in our state to get feedback. Giving the students an authentic audience was a fun addition.
Here's the process we went through.
Step 1: LeeAnn assigned each student a role of Writer, Editor, Graphic Designer and Problem Solver.
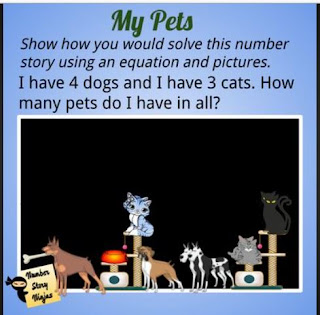
Step 2: Six Writers each created a simple word problem like the one in the picture. These were written on paper, so no tech was needed.
Step 3: I met with the class to introduce them to Google Classroom and Google Slides. After that, the Editors typed the Writers' problems into a basic Google Slides template.
Step 4: I copied their text to a larger Google Slides template that would work with Seesaw. Here's an example of a blank slide. It's 2000 pixels wide, so you really need to make large fonts for them to show up.
I also added some clip art from Pixabay. Do not let students search that site for pictures, due to some content. It does have plenty of transparent images that work great for this project. I pasted possible images in a second slide, then I added the text, our logo, and the "blackboard" image to the first slide.
Step 5: I met with groups of two to four Graphic Designers to help them design the slides using the clip art I provided. No one felt limited by the options I chose, so that was a bonus! Their main task was choosing a title font, background color, then pasting images from the second slide to their template. They got lots of practice using ctrl-c and ctrl-v to copy and paste.
Step 6: After I saw how they wanted the slides to look, I recreated them in Seesaw. This step was a little more time consuming than I expected, but it wasn't bad once I got the hang of it. In Google Slides, I copied the students' slides, then deleted anything that needed to be moveable. I downloaded the remaining items as a JPEG, then uploaded that to Seesaw for the background.
I made this video for teachers, showing how I created the activities in Seesaw. Note that I cropped a lot of images from Pixabay when I put them in Google Slides. Seesaw didn't give me that feature (that I could find). So I ended up editing some Pixabay images in another program, before uploading them to Seesaw as the video shows.
Here are some examples the Seesaw activities we used:
Step 7: We assigned those activities in Seesaw. LeeAnn's students were already very familiar with recording using Seesaw on iPads, so the tech part of this was easy. I met with groups in a quiet part of the school to help with recording.
It took some coaching to get them to go through the problems in a way that would make sense to a viewer. You'll see the directions also asked them to show it with an equation and with the pictures.
I did take about 90 minutes to edit all six videos. There were minor distractions, some mistakes and some prompts from me or other students as they worked.
I remembered at this stage of the project that Liz Kolb (in her Triple E Framework) suggests co-use of devices as a research based practice, to improve engagement with the content. So I had two students work together on some problems and I could see the benefits right away.
Here are a couple examples of the finished product. I think they turned out great! When we use the project again, we agreed we will use more complex math problems.
Two students working together on one iPad, performing an addition problem: